원격 서비스(Remote Service) 관리를 위한 Hystrix 적용 경험기
- 1. Hystrix란?
- 2. 왜 Hystrix를 사용했나?
- 3. 환경 설정하기
- 4. 커맨드 생성
- 5. COMMAND에 Key 선언하기
- 6. Command 속성 설정
- 7. Hystrix 대시보드 사용하기
- 8. 여러 개의 WAS를 한 번에 모니터링하기 (Turbine 적용하기)
- 9. 마무리하기
- 10. 참조 및 기타
2015년 11월 17일 .update @EnableHystrix 를 사용하려면 반드시 ‘spring-boot-acuator’가 pom에 등록되어 있어야 합니다. Spring boot를 사용하지만 acuator가 등록되어 있지 않은 환경에서 삽질을 한참을 했네요;;
Netflix의 Hystrix 사용 경험을 공유하려고 합니다.
Hystrix 사용은 이번이 두 번째인데, 첫 번째는 참여하는 프로젝트에서 다른 동료가 적용하는 걸 지켜봤고, 이번에는 직접 적용을 해봤습니다.
1. Hystrix란?
Netflix에서 개발해 사용 중인 오픈소스로, 원격 시스템이나 서비스를 호출하는 구간을 격리해 관리하고 모니티렁해주는 라이브러리입니다.
Hystrix 깃헙 페이지 상단을 보면 다음처럼 설명을 하고 있습니다.
Hystrix is a latency and fault tolerance library designed to isolate points of access to remote systems, services and 3rd party libraries, stop cascading failure and enable resilience in complex distributed systems where failure is inevitable.
더 자세한 설명은 Hystrix 위키 페이지를 읽어보시기를 바랍니다.
2. 왜 Hystrix를 사용했나?
RFC 방식으로 호출하는 SAP API(인터페이스)를 사용하는 구간을 모니터링 하고 제어하기 위해서 Hystrix를 사용했습니다.
Hystrix를 사용한 더 자세한 이유는 다음과 같습니다.
- Blackbox인 리모트 서비스의 호출 현황을 보고 싶다 :: Hystrix는 대시보드를 통해서 실시간으로 원격 서비스 호출 현황을 보여줍니다.
- 최대한 서비스에 부하를 주지 않았으면 좋겠다 :: Hystrix는 추가적인 부하가 거의 없습니다.
- 자바 외 기술이나 인프라를 추가로 설치하고 싶지 않다 :: Hystrix는 추가로 데이터저장소 등이 필요 없고 단지 대시보드를 실행할 톰캣만 있으면 됩니다.
- 무거운 서비스 호출을 격리하고 싶다 :: Hystrix를 사용하면 각각의 실행 구간을 격리하고, 상황에 따라 실패 처리를 할수가 있습니다. (커넥션 retry, reject 등등). 실행 시간이 길 때는 몇 십초가 걸려 커넥션을 잡아 두고 있는 상황이 빈번하게 발생하는 상황에서는 매우 유용한 방식입니다
- (4번과 이어져서) 각 호출마다 타임아웃 처리가 필요하다 :: 아직도 왜 JCO에서 timeout이 제대로 동작하지 않는지 알수가 없습니다.. 구글링을 해봐도 제대로 안된다는 이야기가 많네요.. 가이드도 소스도 없어 더 이상 확인은 불가능해서 포기.
- 마지막으로는 비동기 프로그래밍 모델을 적용하고 싶었습니다만, 적용하지는 못했습니다…
3. 환경 설정하기
Hystrix와 함께 Spring Cloud Netflix를 사용했습니다.
Spring Cloud를 함께 사용하면 환경 설정이 더 간결해지고, Hystrix 대시보드나 Turbine을 더 쉽게 실행할수 있기 때문입니다.
참고로 Command(뒤에서 설명함)를 애노테이션이 아닌 클래스로 만들려면, rxjava를 직접 pom에 등록해줘야 합니다. 라이브러리 의존관계에서 rxjava의 scope이 runtime으로 선언되어 있어서 에러가 발생하기 때문입니다.
<?xml version="1.0" encoding="UTF-8"?>
<project ...>
    <properties>
        <version.springboot>1.2.7.RELEASE</version.springboot>
        <version.springcloud>Angel.SR3</version.springcloud>
    </properties>

    <dependencyManagement>
        <dependencies>
            <dependency>
                <groupId>org.springframework.boot</groupId>
                <artifactId>spring-boot-dependencies</artifactId>
                <version>${version.springboot}</version>
                <type>pom</type>
                <scope>import</scope>
            </dependency>
            <dependency>
                <groupId>org.springframework.cloud</groupId>
                <artifactId>spring-cloud-starter-parent</artifactId>
                <version>${version.springcloud}</version>
                <type>pom</type>
                <scope>import</scope>
            </dependency>
        </dependencies>
    </dependencyManagement>

    <dependencies>
        <dependency>
            <groupId>org.springframework.cloud</groupId>
            <artifactId>spring-cloud-starter-hystrix</artifactId>
        </dependency>

        <dependency>
            <groupId>io.reactivex</groupId>
            <artifactId>rxjava</artifactId>
            <version>1.0.11</version>
        </dependency>

        <dependency>
            <groupId>org.springframework.boot</groupId>
            <artifactId>spring-boot-starter-actuator</artifactId>
        </dependency>
        ...
    </dependencies>
    ...
</project>
여기서 사용하는 Spring Cloud Angel.SR3 버전에서는 아쉽게도 최신 Hystrix를 사용할 수가 없었습니다. (의존성 : spring-cloud-Angel.SR3 ==> spring-cloud-netflix-1.0.3 ==> netflix.core-1.4.10)
확인해보니 11월 3일 기준으로 최신 Hystrix는 1.4.18이네요. 몇 가지 해결된 이슈 때문에 최신 버전을 사용하고 싶었는데..
그래도 스냅샷이 아니라 정식 버전이라 안전하게 동작하는 맛은 있습니다^^.
4. 커맨드 생성
원격 서비스 구간에 Hystrix를 적용하려면 원격 서비스 호출 로직으로 Command 클래스 만들면 됩니다.
간단히 헬로월드 코드를 보면 다음과 같죠. (전체 코드 참조하기)
public class CommandHelloWorld extends HystrixCommand<String> {

    private final String name;

    public CommandHelloWorld(String name) {
        super(HystrixCommandGroupKey.Factory.asKey("ExampleGroup"));
        this.name = name;
    }

    @Override
    protected String run() {
        // a real example would do work like a network call here
        return "Hello " + name + "!";
    }
}
Remote 서비스 호출 로직을 run() 함수 안에 구현하면 됩니다. 간단하죠^^.
아니면 @HystrixCommand 를 사용하는 방법도 있습니다.
둘 중에 Java 클래스를 직접 만들어 사용했습니다. 동적으로 CommandKey와 GroupKey를 생성해야 하기 때문에 애노테이션보다는 클래스를 직접 작성하는 쪽이 더 편했기 때문입니다.
마지막으로 Spring Cloud에서 제공하는 애노테이션을 사용해 Hystrix를 활성화하면 완료.
@Configuration
@EnableHystrix
public class AppConfig {
    ...
}
5. COMMAND에 Key 선언하기
Command를 생성할 때는 총 3개의 키를 줄수 있습니다.
CommandGroupKey(이하 CGK), CommandKey(이하 CK), ThreadPoolKey(이하 TPK) 3가지 입니다. ThreadPoolKey를 등록하지 않으면 CommandGroupKey를 TPK로 사용합니다.
예제를 보면 거의 대부분 고정된 이름으로 CGK와 CK를 사용하는데, 저는 하나의 Command 클래스를 사용해 여러 API를 호출하는 구조라 CGK와 CK를 동적으로 생성해 사용했습니다.
public class SAPHystrixCommand extends HystrixCommand<Object> {
    public SapHystrixCommand(SomeParam param) {
        super(Setter
            .withGroupKey(resolveGroupKey(param))
            .andCommandKey(HystrixCommandKey.Factory.asKey(param))
            .andThreadPoolKey(resolveThreadPoolKey(param))
        );
    }
}
resolveGroupKey(..)와 resolveThreadPoolKey(..)를 사용해 키를 동적으로 생성했습니다. 물론, 동일한 키가 만들어지면 동일한 Command로 동작하게 됩니다.
Hystrix에서는 키(key) 별로 쓰레드풀을 관리하고 실행하기 때문에 적절하게 그룹과 쓰레드풀을 나눠줄 필요가 있습니다. 수십 개의 Command를 생성해도 CGK와 TPK를 나누지 않으면 하나의 쓰레드풀로 돌아가게 됩니다. 기본 쓰레드풀 크기는 10개이기 때문에 금방 문제가 되겠죠?
제 사례에서는 SAP 인터페이스를 SAP 모듈 별로 분리해서 그룹/쓰레드풀로 묶었고, 각 쓰레드풀의 쓰레드 크기는 30으로 주었습니다. 모듈 갯수가 5개 였고, 혹시 모를 etc까지 추가로 만들었으니 총 쓰레드풀이 크기는 6*30=180개가 되겠네요.
참고로 쓰레드풀 크기를 정할 때는 Hystrix 위키의 설명이 많이 도움이 되었습니다.
6. Command 속성 설정
Key 외에도 다양한 Command와 ThreadPool 속성을 설정할 수 있습니다.
상세한 설정은 Hystrix 위키의 Configuration 페이지에 정리가 잘 되어 있습니다.
이 중에서 타임아웃 설정(execution.isolation.thread.timeoutInMilliseconds)과 쓰레드풀 크기 설정(hystrix.threadpool.default.coreSize)은 필수인듯하고, 다른 설정은 필요에 따라 사용하면 될듯 합니다.
프로퍼티 설정은 Key와 함께 Command 클래스의 생성자에 적습니다. 코드가 좀 길어서 보기 어려운 게 단점이라면 단점이죠;
public class SAPHystrixCommand extends HystrixCommand<Object> {
    public SapHystrixCommand(SomeParam param) {
        super(
            ...
            .andCommandPropertiesDefaults(
                HystrixCommandProperties.Setter()
                    .withCircuitBreakerEnabled(true)
                    .withExecutionTimeoutInMilliseconds(30000)
                    .withExecutionTimeoutEnabled(true)
                    .withFallbackEnabled(false)
            )
            .andThreadPoolPropertiesDefaults(
                HystrixThreadPoolProperties.Setter().withCoreSize(30))
        );
    }
}
참고로 ThreadPoolKey를 선언해야만 쓰레드풀 설정이 적용 된다는 점을 기억하시면 좋습니다.
7. Hystrix 대시보드 사용하기
Hystrix 대시보드는 Command 실행 결과를 실시간으로 수집해서 보여줍니다. (아래 그림은 Hystrix 홈페이지에서 참조)
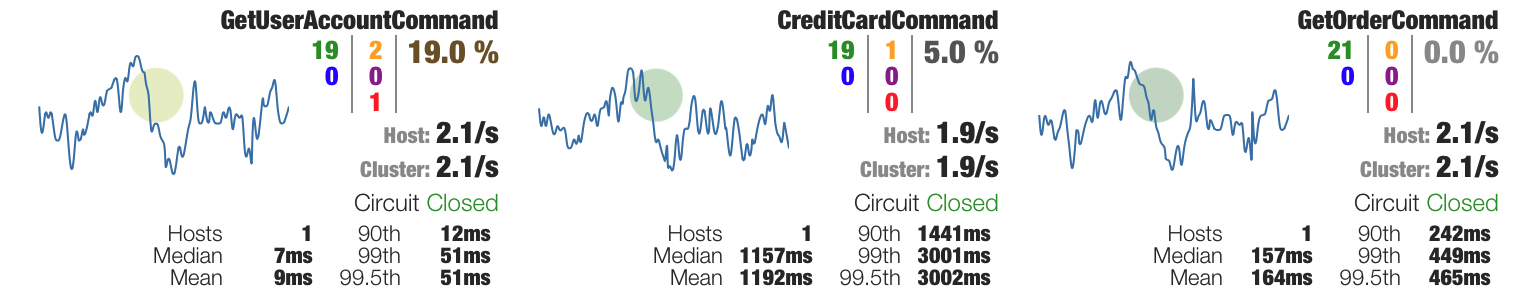
대시보드 URL은 http://{WAS_IP}:{PORT}/hystrix.stream입니다. 이 URL로 요청을 보내면 폴링을 시작한다는 로그가 남으니 정상적으로 시작했는지 확인할 수가 있습니다.
[INFO] [HystrixMetricsStreamServlet:142] : Starting poller
[INFO] [HystrixMetricsPoller:82] : Starting HystrixMetricsPoller
[INFO] [HystrixMetricsPoller:82] : Starting HystrixMetricsPoller
[INFO] [HystrixMetricsStreamServlet:142] : Starting poller
[INFO] [HystrixMetricsStreamServlet:142] : Starting poller
워낙 대시보드를 간단하게 실행할 수 있지만, Spring Cloud를 사용하면 스프링 기반으로 APP으로 더 간단하고 쉽게 실행할 수 있습니다.
@SpringBootApplication
@EnableHystrixDashboard
public class HystrixDashboardApp extends SpringBootServletInitializer {
    @RequestMapping("/")
    public String home() {
        return "forward:/hystrix";
    }

    @Override
    protected SpringApplicationBuilder configure(SpringApplicationBuilder application) {
        return application.sources(HystrixDashboardApp.class).web(true);
    }

    public static void main(String[] args) {
        new SpringApplicationBuilder(HystrixDashboardApp.class).web(true).run(args);
    }
}
물론 그전에 pom 파일을 작성해야겠죠? POM에는 대시보드 관련 의존성을 걸어주면 됩니다.
<?xml version="1.0" encoding="UTF-8"?>
<project ...>
    <artifactId>framework-sap-monitoring</artifactId>
    <version>1.0-SNAPSHOT</version>
    <packaging>war</packaging>

    <properties>
        <java.version>1.7</java.version>
        <version.springboot>1.2.7.RELEASE</version.springboot>
        <version.springcloud>Angel.SR3</version.springcloud>
    </properties>

    <dependencyManagement>
        <dependencies>
            <dependency>
                <groupId>org.springframework.boot</groupId>
                <artifactId>spring-boot-dependencies</artifactId>
                <version>${version.springboot}</version>
                <type>pom</type>
                <scope>import</scope>
            </dependency>
            <dependency>
                <groupId>org.springframework.cloud</groupId>
                <artifactId>spring-cloud-starter-parent</artifactId>
                <version>${version.springcloud}</version>
                <type>pom</type>
                <scope>import</scope>
            </dependency>
        </dependencies>
    </dependencyManagement>

    <dependencies>
        <dependency>
            <groupId>org.springframework.cloud</groupId>
            <artifactId>spring-cloud-starter-hystrix-dashboard</artifactId>
        </dependency>

        <dependency>
            <groupId>org.springframework.boot</groupId>
            <artifactId>spring-boot-starter-web</artifactId>
        </dependency>

        <dependency>
            <groupId>org.springframework.boot</groupId>
            <artifactId>spring-boot-starter-tomcat</artifactId>
            <scope>provided</scope>
        </dependency>

        <dependency>
            <groupId>org.apache.tomcat.embed</groupId>
            <artifactId>tomcat-embed-jasper</artifactId>
            <scope>provided</scope>
        </dependency>

        <dependency>
            <groupId>org.springframework.cloud</groupId>
            <artifactId>spring-cloud-starter-hystrix</artifactId>
        </dependency>
    </dependencies>
</project>
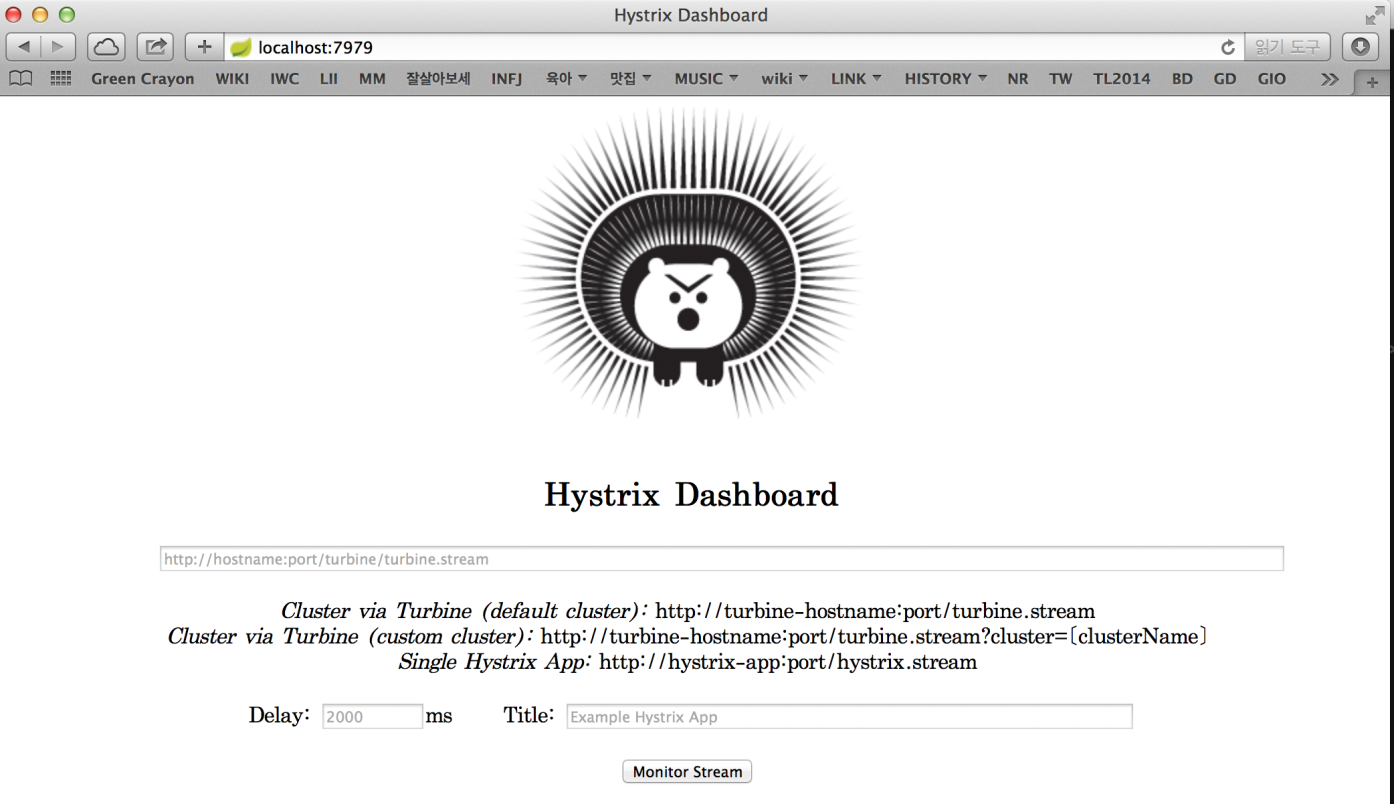
대시보드 APP을 실행하고 WAS의 Stream 주소를 적어주면 됩니다.
(화면에 설명이 나오는 것처럼) 하나의 WAS를 모니터링할 때는 http://{ip}:{port}/hystrix.stream으로, 여러 개의 WAS를 모니터링할 때는 http://{ip}:{port}/turbine.stream을 입력합니다.
8. 여러 개의 WAS를 한 번에 모니터링하기 (Turbine 적용하기)
WAS를 이중화해서 사용할때는 WAS 별로 대시보드 화면을 보는 것이 아니라 하나의 화면으로 묶어서 보고 싶겠죠.
이럴 때는 Turbine을 함께 사용하면 됩니다. Turbine은 각 WAS의 Command 실행 결과를 수집해서 다시 대시보드로 보내주는 역할을 합니다.
Turbine은 2.x와 1.x 버전이 있습니다. 2.x는 인스턴스 식별을 Eureka를 통해서만 가능하다는 점이 특징입니다.
그렇기 때문에 (저처럼..) Eureka는 사용하지 않고 Hystrix+Turbine을 사용하고 싶은 경우에는 1.x 버전을 사용해야 합니다. Spring Cloud를 사용하면 Turbine 2.x를 사용이 필수므로 Turbine은 Spring Cloud를 통하지 않고 직접 설정해 사용을 했습니다.
직접 사용하는 방법 역시 그리 어렵지 않습니다. 서블릿만 등록하면 됩니다.
@SpringBootApplication
public class TurbineApp extends SpringBootServletInitializer {

    @Bean
    public ServletRegistrationBean turbine() {
        ServletRegistrationBean bean = new ServletRegistrationBean();
        bean.setServlet(new TurbineStreamServlet());
        bean.addUrlMappings("/turbine.stream");
        return bean;
    }

    @Override
    protected SpringApplicationBuilder configure(SpringApplicationBuilder application) {
        return application.sources(TurbineApp.class).web(true);
    }

    public static void main(String[] args) {
        new SpringApplicationBuilder(TurbineApp.class).web(true).run(args);
    }
}
이제 ‘/turbine.stream’으로 Turbine을 동작시킬 수 있습니다.
Turbine 1.x에서는 인스턴스를 식별하는 방법으로 1) 프로피티 파일을 사용하는 방법, 2) 직접 자바 인터페이스 구현하는 방법, 그리고 3) Eureka 사용하는 3가지 방법을 제공합니다.
저는 그 중에 1번 방법을 사용했습니다. 프로퍼티 파일은 ‘config.properties’ 이름으로 클래스패스 루트에 두면 됩니다.
프로퍼티에는 클러스터 이름과 클러스터에서 모니터링할 Hystrix stream URL을 적어주면 됩니다.
turbine.aggregator.clusterConfig={클러스터이름}

turbine.instanceUrlSuffix.{클러스터이름}=:8888/hystrix.stream
turbine.ConfigPropertyBasedDiscovery.{클러스터이름}.instances=127.0.0.1
여러 클러스터에서 함께 사용하려면 ‘,’로 구분해 기록하면 됩니다.
turbine.aggregator.clusterConfig=app-local,app-prod
다음으로는 클러스터 별 인스턴스 정보를 기록해주어야 합니다.
turbine.instanceUrlSuffix.app-local=:8888/hystrix.stream
turbine.ConfigPropertyBasedDiscovery.app-local.instances=127.0.0.1
turbine.instanceUrlSuffix.app-prod=/hystrix.stream
turbine.ConfigPropertyBasedDiscovery.app-prod.instances=111.0.0.1
마지막으로 하나의 클러스터가 여러 개 인스턴스의 스트림을 수집할 때는 인스턴스에 ‘,’로 구분해 기록하면 됩니다.
turbine.instanceUrlSuffix.app-prod=/hystrix.stream
turbine.ConfigPropertyBasedDiscovery.app-prod.instances=111.0.0.1:8001,111.0.0.1:8002
이렇게 만들어진 config.properteis 파일은 아래와 같습니다.
turbine.aggregator.clusterConfig=app-local,app-prod

turbine.instanceUrlSuffix.app-local=:8888/hystrix.stream
turbine.ConfigPropertyBasedDiscovery.app-local.instances=127.0.0.1
turbine.instanceUrlSuffix.app-prod=/hystrix.stream
turbine.ConfigPropertyBasedDiscovery.app-prod.instances=111.0.0.1:8001,111.0.0.1:8002
프로퍼티 파일 작성할 때부터 운영 환경을 감안해서 잘 작성해야 겠군요~ 굿.
클라우드 환경이 아니라면 이렇게 프로퍼티 파일을 직접 작성해서 관리해도 괜찮습니다. 서버 IP가 매순간 동적으로 변경되는 건 아니니까요…
이렇게까지 하면 잘될지 알았는데 여기서 한참을 해맸습니다. 아무리 봐도 틀린 곳이 없었는데 config.properties에 적은 설정이 동작하지 않았어요..
한참을 검색하고 돌려보고 나서야 초기화 로직이 돌아가지 않는 걸 확인하고 문제를 찾았습니다. 말 그대로 config.properties를 로딩해서 초기화를 하지 않은 것이었습니다. (왜 위키에는 적어두지 않았을까..;;)
그래서 초기화 로직을 서블릿 리스너로 추가를 하니 드디어 완료.
@SpringBootApplication
public class TurbineApp extends SpringBootServletInitializer {
    ...
    @Bean
    public ServletListenerRegistrationBean turbineListener() {
        ServletListenerRegistrationBean bean = new ServletListenerRegistrationBean();
        bean.setListener(new TurbineListener());
        return bean;
    }

    static class TurbineListener implements ServletContextListener {
        private final Logger logger = LoggerFactory.getLogger(TurbineListener.class);

        @Override
        public void contextInitialized(ServletContextEvent servletContextEvent) {
            logger.info("Initialize Turbine!");
            TurbineInit.init();
        }

        @Override
        public void contextDestroyed(ServletContextEvent servletContextEvent) {
            logger.info("Shutdown Turbine!");
        }
    }
}
이제 Hystrix 대시보드에서 Turbine 스트림을 통해 리모트 서비스 모니터링이 가능합니다.
예를 들어, app-prod를 보려면 ‘http://{turbine-host}:{port}/turbine.stream=?cluster=app-prod’를 입력하면 됩니다.
9. 마무리하기
이번 글, 그리고 적용 사례에서는 대규모 트래픽과 그에 따른 Curcuit Breaker 상황을 제어하는 로직에 대해서는 크게 신경을 쓰지 않았습니다. 물론, 임계치를 설정하기는 했지만 특수한 이벤트가 벌어질 때 트래픽이 몰리는 사이트는 아니기 때문이죠. 그런측면에서 Semaphore 방식을 사용할까 생각해보기도 했지만 원격 호출에 대한 격리가 더 중요하다고 생각해 ThreadPool 방식을 사용했습니다.
이번에도 느꼈지만 Hystrix OSS는 간결하고, 핵심을 피해가지 않는 과감함(?!), 그리고 그들만의 상황 해석 능력을 바탕으로 만들어졌다는 점이 마음에 듭니다.
조만간 Hystrix를 다른 사이트에 추가로 적용하고, 운영을 지원하면서 튜닝을 더 해볼려고 합니다. 특히나 Hystrix 위키에 있는 내용을 좀더 공부해야겠습니다. 정말 좋은 내용이 많은데 그 뜻까지 이해하기는 어렵네요…
그럼 이만 이번 글을 마무리짓도록 하겠습니다.
10. 참조 및 기타
- Hystrix
- Turbine
- Spring Cloud Samples
- 간헐적으로 ‘Failed to output metrics as JSON java.lang.IllegalStateException: Queue full’가 발생합니다. 원인은 아직 모릅니다. 큰 문제는 일어나지 않지만요…
- WAS를 톰캣 매니저로 재가동할 때 Hystrix 메모리 릭 경고가 떨어집니다. Hystrix는 ThreadLocal을 많이 사용하는데 주의 깊게 볼 필요가 있습니다. 셧다운을 제대로 할 때는 문제가 없습니다.